
Your Facebook thumbnail is the first thing that people see when they come across your Facebook page. A good thumbnail can make all the difference in attracting potential followers and making a good first impression. In this article, we’ll go through the steps to edit your Facebook thumbnail image and make it stand out.
STEP 1: ACCESS YOUR FACEBOOK PAGE
The first step in editing your Facebook thumbnail is to access your Facebook page. You can do this by logging into your Facebook account and clicking on your page in the top left corner of the screen.

STEP 2: NAVIGATE TO YOUR FACEBOOK THUMBNAIL IMAGE
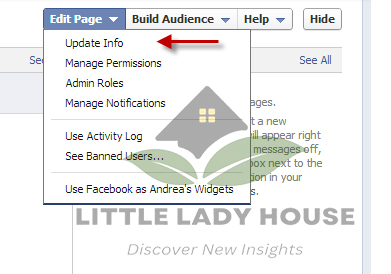
Once you are on your Fb page, go to the “Settings” tab at the top corner right of the page. From there, mouse over “Edit Page” and select “Update Info.” This will bring up a list of options, one of which is “Profile Picture.” Click on “Profile Picture” to access your Facebook thumbnail image.
STEP 3: CHOOSE A NEW THUMBNAIL IMAGE
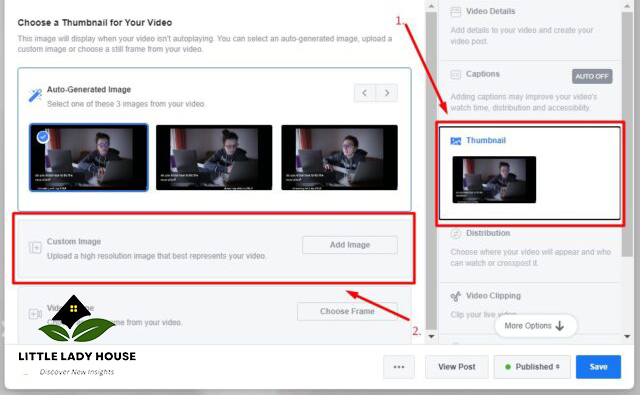
To choose a new thumbnail image, click on the “Change Picture” button. This will bring up a window where you can select a new image from your computer or device. You can also choose an image from your Facebook photos or upload a new image by clicking on the “Upload Photo” button.
STEP 4: CROP YOUR THUMBNAIL IMAGE
Once you have selected your new thumbnail image, you will need to crop it to the proper size. Facebook recommends a thumbnail image size of 170 x 170 pixels. To crop your picture by choosing the desired area of the picture using the crop tool. you want to use as your thumbnail. Once you have cropped your image, click the “Save Changes” button.
STEP 5: REVIEW YOUR THUMBNAIL IMAGE
Before you finalize your new thumbnail image, it’s important to review it to make sure it looks good and represents your page well. Look at the image on both desktop and mobile devices to ensure it looks good in both contexts.
TIPS FOR CHOOSING THE PERFECT FACEBOOK THUMBNAIL IMAGE
In addition to following the steps outlined above, there are a few tips to keep in mind when choosing your Facebook thumbnail image.
Use images of a high standard: Use photos of a high caliber that are clear and well-lit. This will ensure that your thumbnail image looks good on both desktop and mobile devices.
Make It Relevant: Choose an image that is relevant to your page and represents what your page is about. For example, if your page is about a business, use an image of your product or logo.
Be Consistent: Make sure your thumbnail image is consistent with the rest of your brand and the images you use on your website and other social media platforms.
Keep It Simple: Avoid using images that are too busy or have too much text. Simple, clean images are more effective in catching people’s attention.
Update Regularly: Update your thumbnail image regularly to keep your page looking fresh and to reflect changes in your business or brand.
CONCLUSION
In conclusion, editing your Facebook thumbnail image is a simple process that can have a big impact on your Facebook page. By following the steps outlined above and keeping in mind the tips for choosing the perfect thumbnail image, you can make sure that your Facebook page makes a great first impression.
For more information, click here.


Very informative 👏
OMG it’s super easy.