
Many women struggle with the pointy shape some bras create, but simple tips and tricks help you Make a Pointy Bra Round. This article will explore different methods and techniques to help you achieve the desired shape and boost your confidence. If you want a quick fix or a more permanent solution, I’ve covered you. Let’s dive into bra shaping and discover how to quickly make a pointy bra round.
Table of Contents
How to Make a Pointy Bra Round?
Many women struggle with pointy bras, but there are simple tips and tricks to help you achieve a round and flattering shape. One solution is to look for bras with a more rounded cup shape, which can help create a more natural silhouette. You can also try using silicone bra inserts or padding to help fill out the cups and achieve a smoother, rounder look.
Additionally, ensuring that the bra fits properly and is the right size for your body can make a big difference in shaping and support. Finally, experimenting with different bra styles and brands can help you find the perfect fit and shape for your body type. With these tips, you can transform your pointy bras into a more flattering and comfortable shape.
Why Alter Your Bra?
Bra shopping can be tricky. Sometimes, the fit is excellent, but the shape doesn’t work. For instance, I started with a 30H Ewa Michalak bra that was slightly roomy in the cups but gave me an overly pointy look. After making a few strategic adjustments, I transformed it into a bra that provides a rounded silhouette and enhances cleavage.
What You’ll Need
To get started, gather these materials:
- Safety pins
- A needle and thread
- A bra that is slightly too big or fits just right (not too small)
Step-by-Step Alteration Process
1. Pinning the Fabric
The first step is to adjust the fabric along the diagonal seam of the bra. Follow these instructions:
- Lay the bra flat and locate the diagonal seam across the cup.
- Use safety pins to gather the fabric along this seam. Tuck the upper portion of the fabric underneath the diagonal seam.
- Taper the gathered fabric outward as you move toward the ends of the bra cup. Focus on two areas:
- Near the straps (after the intersection of the vertical and diagonal seams).
- Towards the gore (the center piece between the cups).
- Ensure the pinning is symmetrical on both cups for an even shape.
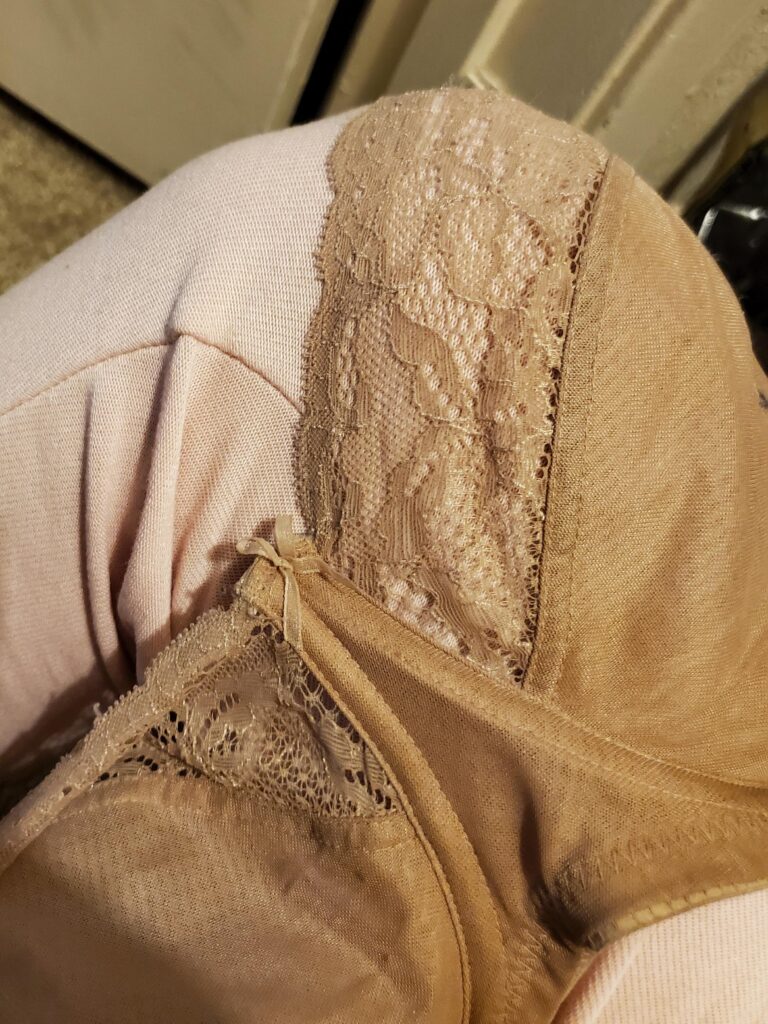
2. Test the Fit
Before sewing, try on the pinned bra to assess the fit and shape. Adjust the placement of the gathered fabric until you are satisfied with how it looks and feels. This step is crucial to achieving your desired result.
![]()
3. Sewing the Seam
Once you’re happy with the pinning:
- Thread your needle and start sewing along the pinned seam.
- To ensure the bra stretches naturally when worn, place it over your knee and gently stretch it as you sew. This technique prevents the seams from puckering or pulling when the bra is used.
- Make tiny, secure stitches to ensure durability, and remove the pins as you go.

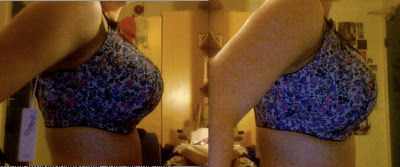
Before and After Transformation
This alteration results in a bra with a smooth, rounded shape instead of a pointy silhouette. In my case, the 30H bra ended up slightly smaller in the cups due to the gathered fabric, but it fit beautifully and offered a flattering look.
Important Notes and Tips
-
Choose the Right Bra: This alteration reduces the overall cup volume. Start with a bra that is slightly too big or fits comfortably but has room to spare.
-
Consider Bra Style: This method works best on bras with diagonal and vertical seams. It may not work on molded cups or seamless styles.
-
Symmetry is Key: Take your time to ensure both cups are adjusted evenly. An uneven alteration can affect the overall fit and look.
-
Practice Patience: If this is your first time altering a bra, don’t rush. A little trial and error can go a long way toward achieving a great result.
Troubleshooting Common Issues
-
Uneven Cups: Ensure that both cups are altered symmetrically. Double-check measurements and pin placements before sewing.
-
Puckering Fabric: Maintain consistent tension while sewing and avoid pulling the thread too tightly to prevent puckering.
-
Discomfort After Alteration: If the bra feels uncomfortable after the alteration, consider reversing the stitches and adjusting the amount of fabric gathered.
Best Bra For Lift And Side Support
Q1: Will this alteration work on all bra styles?
This method is most effective on bras with diagonal and vertical seams, such as full-cup or seamed bras. It may not be suitable for molded cups, seamless bras, or bras made from delicate lace, as these materials and constructions don’t lend themselves well to this type of alteration.
Q2: Can I reverse the alteration if I’m unsatisfied with the result?
Since this technique doesn’t involve cutting the fabric, you can carefully remove the stitches to restore the bra to its original shape. Use a seam ripper to gently unpick the stitches, taking care not to damage the fabric. To avoid mishaps, proceed slowly and in good lighting.
Q3: How much will this alteration reduce the cup size?
The reduction varies depending on the amount of fabric gathered. Generally, it decreases slightly, approximately 1/4 of a cup size. Therefore, starting with a slightly too large bra is advisable to accommodate the decrease in cup volume. Over-altering can lead to discomfort or an ill fit, so adjust gradually.
Q4: Do I need advanced sewing skills to perform this alteration?
Basic sewing skills are sufficient for this alteration. The key is to sew carefully and ensure symmetry between both cups. Tools like safety pins or fabric tape can help hold the fabric in place as you sew, making the process more manageable. Patience and attention to detail will also contribute significantly to a successful outcome.
Q5: Will this alteration affect the bra’s overall support?
Altering the cup shape can impact the bra’s support and fit. While the goal is to achieve a rounder shape, ensuring that the alteration doesn’t compromise the bra’s structural integrity is essential. Monitor how the bra feels during wear; if you notice a significant decrease in support or comfort, you may need to adjust your alterations or consult a professional lingerie tailor.
Q6: Can I perform this alteration on a padded or push-up bra?
Altering padded or push-up bras can be more challenging due to the additional layers and materials. The padding may not gather evenly, leading to an uneven appearance. It’s generally recommended that this alteration be performed on unpadded bras with easily manipulated fabric. If you alter a padded bra, proceed cautiously and consider practising on an older or less expensive bra first.
Q7: How long does this alteration typically take?
The time required varies depending on your sewing experience and the complexity of the bra’s design. For someone with basic sewing skills, the process may take about 1 to 2 hours. Not rushing is essential; taking time ensures a neater and more effective alteration.
Q8: Are there any risks involved in altering my bra myself?
While this alteration is relatively straightforward, there are potential risks, such as:
- Fabric Damage: Improper stitching or removal of stitches can cause holes or tears.
- Fit Issues: Over-altering can lead to discomfort or an ill-fitting bra.
- Structural Integrity: Altering key seams may affect the bra’s support.
To minimize these risks, work carefully, make minor adjustments, and consider practising on an older bra before altering one you regularly wear.
SHARE ON PINTEREST: